Saturday 15 September 2012

The Triangle of Exposure

Exposure -  is the process of recording light onto your digital sensor. It is basically the amount of light (controlled by the aperture) that is captured over a specific amount of time (controlled by the shutter speed). Exposure is determined by three camera settings: aperture, ISO and shutter speed.


Aperture - is a circular opening in your lens that is adjustable from a very small circle to almost as large as the lens itself. We adjust it to let more or less light to hit the digital sensor. Aperture is denoted as fstop and controls along with shutter speed how much light hits the sensor. Big hole, more light hitting the sensor and small hole means lesser light hitting the sensor. A higher aperture number (fstop) means a lower opening and a lower aperture number (fstop) means higher the opening. Think of aperture numbers as denominators (bottom number) of a fraction and it would be easy to remember.


Aperture along with distance to your subject and lens focal length determines depth of field (DOF). The smaller the fstop (bigger number) the deeper the DOF, where everything is in focus. And the bigger the fstop (smaller number) the shallower the DOF, where only the subject is in focus. And by adjusting the fstop values you can determine how much of the image is in focus.


Shutter Speed - A shutter is a curtain in front of the camera sensor that stays closed until the camera fires. When the camera fires, the shutter opens and fully exposes the camera sensor to the light that passes through the lens aperture. After the sensor is done collecting the light, the shutter closes immediately, stopping the light from hitting the sensor. The button that fires the camera is also called “shutter release button” or “shutter button”, because it triggers the shutter to open and close. 


Shutter speed, also known as “exposure time”, stands for the length of time a camera shutter is open to expose light into the camera sensor. If the shutter speed is fast, it can help to freeze action completely. If the shutter speed is slow, it can create an effect called “motion blur”, where moving objects appear blurred along the direction of the motion. This effect is used quite a bit in advertisements of cars and motorbikes, where a sense of speed and motion is communicated to the viewer by intentionally blurring the moving wheels. Slow shutter speed can cause camera shake which in turn can produce blurred images. So it’s always a good idea to use a tripod for slow shutter speeds.
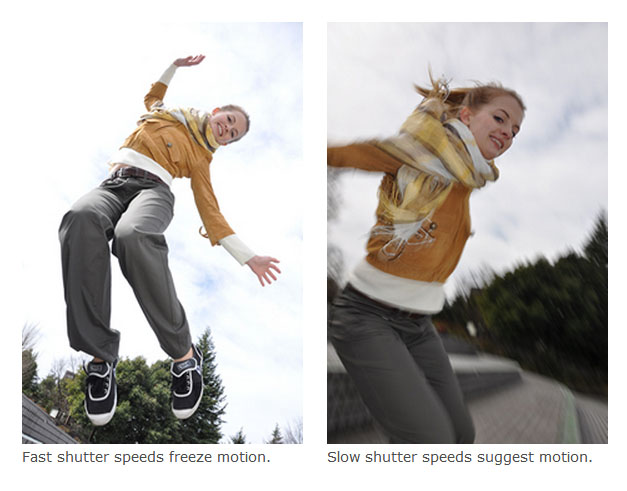
Shutter speeds are expressed in fraction of a second 1/8, 1/125, 1/1000 etc. but in most modern digital cameras you may not see the 1/ expressed (but they still are fraction). You most likely see the above expressed as 8, 125, 1000 etc.

ISO In Digital Photography ISO measures the sensitivity of the image sensor. The lower the ISO number the less sensitive your camera is to light and the finer the grain. Higher ISO settings are generally used in darker situations to get faster shutter speeds (for example an indoor sports event when you want to freeze the action in lower light) – however the cost is noisier shots. Digital cameras convert the light that falls on the image sensor into electrical signals for processing.


The slow shutter speeds needed for dark interior scenes leave photographs prone to camera blur. If you raise ISO sensitivity, you can choose faster shutter speeds and reduce camera blur. This is why people say that ISO sensitivity should be raised if lighting is poor. ISO sensitivity can be set manually by the photographer or automatically by the camera.

No-Flash Low Light Photography - When lighting is poor, you can use a flash to light portrait subjects. Flash units, however, have limited range. If you raise ISO sensitivity, you can optimally expose both the portrait subject and the background without using a flash at all.
Noise - Raising ISO sensitivity allows faster shutter speeds, reducing blur caused by subject or camera movement. You may wonder why, if that’s the case, you shouldn’t simply always shoot at the highest ISO sensitivity setting, but in fact raising ISO sensitivity can introduce a type of image artifact known as “noise” into your photographs, making them seem grainy. Raising ISO sensitivity amplifies the electronic signal, which also amplifies any noise in the signal; as a result, the higher the ISO sensitivity, the more obvious the effects of noise on your photographs. The same is true of all digital cameras. We recommend that you raise ISO sensitivity only as high as needed to avoid blur.


Sources: Nikon Website, Photo Tuts+, Digital Photography School

Friday 14 September 2012

Camera Lens


A camera lens is made up of multiple lens elements assembled and fitted together in a tube called a lens barrel. One of the major advantages of using an SLR camera is its ability to change lenses. You could go for wide angle to squeeze more in, a telephoto to magnify a distant subject, or a macro lens for taking great quality close-ups. There’s almost no limit to what you can do, with lenses to suit all occasions and budgets.


Focal Length

Every lens is defined in millimeters, and this measure is called its focal length. This measurement is the distance between the sensor and the optical centre of the lens when the lens is focused on infinity. A short focal length allows you to stand close to your subject so that they fill the frame and things in the background seem farther away than normal. Examples of short focal lengths are 15mm, 20mm, 35mm. A long focal length allows you to stand far away from the subject so that it still fills the frame, but that things in the background seem closer than normal. Examples are 85mm, 105mm, 300mm. The focal length range is printed on the lens barrel along with the most commonly used focal lengths.


Types of DSLR Lenses

Standard Lenses - Also known as a "normal lens", is one which produces an image that roughly matches what the human eye sees, and which looks natural to the viewer. Standard lenses have an angle of view of around 50 to 55 degrees diagonally. This is roughly the same as the angle that the human eye can comfortably view, which is why it gives a natural-looking perspective. Normal lenses make great general-purpose lenses, and can be used to photograph everything from close-up portraits to landscapes. They tend to be very "fast" lenses (i.e. they have a wide aperture), making them great for indoor and low-light photography.

Kit Lenses – Lens that is offered as a package with the DSLR is generally called the ‘kit lens’. It is generally an entry level quality zoom lens. They are usually a fairly general purpose lens designed for everyday shooting. Personally I prefer to buy the DSLR as body only and buy the lenses separate giving me more range as the kit lenses are generally at a lower to medium end of the spectrum of lenses. 18-55mm and 18-105mm are common Kit lenses.


Prime Lenses – Majority of the lenses that you see are zoom lenses (18-55mm, 55-200mm, 18-200mm), meaning they can be adjusted from one focal length to another. Prime lenses are lenses that have only one focal length. (35mm, 50mm, 85mm). The advantage of a prime lens is the fact that they are comparatively cheaper than zoom lenses and also faster, meaning the apertures on them are large (f2.8, f1.2). 

Telephoto Lenses – Or Zoom lenses are lenses that let you photograph distant objects without getting closer to the subject. They are the most common type of lenses you will find in the market. A common question asked around these days is, what zoom do you have for this camera? The question is a result of point and shoot (P&S) and bridge camera manufacturers advertising their cameras focusing on the zoom (X) and megapixel (MP) aspect. Zoom is a feature of the lens and not the camera. Therefore in DSLR field, it’s the wrong question to ask, because zoom factor changes with the changing of lenses. Zoom is calculated by dividing the largest focal length of the lens by the smallest one. So an 18-55mm lens has a 3x zoom and so does 100-300mm lens, irrespective of the focal length covered. 

Macro Lenses - A macro lens is defined as one that is capable of producing an image on the sensor that is the same size or larger than the actual object being photographed.   This is expressed as a reproduction ratio of 1x or 1:1. True macro lenses enable you to get in incredibly close to the subject you are shooting.


Wide Angle Lenses - As their name suggests, these lenses enable their users to take shots with a very wide perspective. They are useful for landscapes and for getting in nice and close to subjects still fitting a lot of them in. Wide angle lenses come both as prime lens and lower end zoom lens.

Source: Nikon Website, Digital SLR Photography

Thursday 13 September 2012

DSLR Camera Setup

Digital cameras take photographs using an image sensor that converts light to electronic signals. The distinguishing feature of single-lens reflex (SLR) cameras is that the optical viewfinder displays the view through the camera lens. The “single lens” in the name “single-lens reflex” is a reference to this feature: a single lens serves both for taking photographs and for the viewfinder. The “reflex” portion refers to the reflection of light.

Some newer digital SLR cameras can display the view through the lens in the monitor: this is known as “live view.” The mirror is raised during live view; blocking the light that would otherwise reach the focusing screen and preventing photographs from being framed in the viewfinder.
---------------------------------------------------------------------------------------------
Before the shutter-release button is pressed all the way down, the mirror inside the camera is positioned between the lens and the shutter curtain, reflecting the light from the lens upwards. A pentaprism or pentamirror guides the light into the optical viewfinder. 
---------------------------------------------------------------------------------------------
When the shutter-release button is pressed all the way down, the mirror is raised and the shutter curtain opens, allowing the light passing through the lens to proceed directly to the image sensor and a photograph is taken. The shutter then closes and the mirror drops back into its original position.

Source: Nikon Website

Wednesday 12 September 2012

DSLR - Key Features

The first step in learning to become a professional photographer is to know your equipment. Though the layout of the camera may differ from brand to brand, the basic features remain more or less the same across all cameras. 

Lets begin by looking at different featuers of your camera and what they do. Understanding these key functions help you to take great pictures fast and with ease.


1. SHUTTER RELEASE
Press the shutter release button halfway down to activate the auto-focus and exposure systems then fully to take the picture.

2. EXPOSURE COMPENSATION
This is an important exposure override, usually designated with a +/- symbol. Use it to increase or decrease the exposure in 1/3 or 1/2-stop increments.

3. EXPOSURE MODE DIAL
The exposure mode determines how scenes are captured. Full auto is ideal for beginners, but you should aim to shoot using one of the semi-auto modes.

4. INTEGRAL FLASH
The range of the built-in-flash is limited to a few meters but is ideal when taking pictures of friends and family. Most models include a number of flash modes.

5. HOTSHOE
The integral flash is very useful for nearby subjects but, when extra power or features are required, the solution is to slip a flashgun on the hotshoe.

6. Fn BUTTON
Some cameras sport a Fn (Function) button for fast access to regularly selected functions, such as ISO rating, White Balance, AF modes or the drive function.

7. FLASH BUTTON

With most DSLRs, you press a flash button to pop up the integral flash while in one of the 'creative' modes, such as aperture or shutter-priority.


8.MAGNIFIER BUTTONS
When reviewing your stored photos, you can zoom into the image to check sharpness. By using the four- way control, you can move from one area of the magnified image to another.

9. MENU BUTTON
The on-screen menu system allows access to the majority of a camera's functions and is quickly activated by pressing the MENU button beside the LCD monitor.

10. LCD MONITOR
This is the information center of your digital SLR, allowing access to most of the camera's settings, as well as the chance to review and edit images and, with many models, shoot in Live View.

11. VIEWFINDER
The viewfinder image comes via the lens and the reflex mirror, which bounces the image up into the pentaprism. A hood cuts out stray light to provide a clearer, brighter image.

12. INPUT DIALS
Use these to change settings such as apertures and shutter speeds. They're usually found on the hand-grip, on the rear where your thumb rests or, on some models, in both positions.

13. FOUR-WAY CONTROL
This handy control, found on most DSLRs, offers an up, down, left and right control and allows you to quickly navigate through the various menu options that appear on the LCD monitor.

14. MEMORY CARD SLOT
DSLRs require memory cards boasting big capacities (you should aim for 2GB-8GB). CompactFlash. SD/SDHC and MemoryStick cards are able to hold several gigabytes of information.

Source: Digital SLR Photography